
|
|---|
|
|||||||||||||||||||||||||||
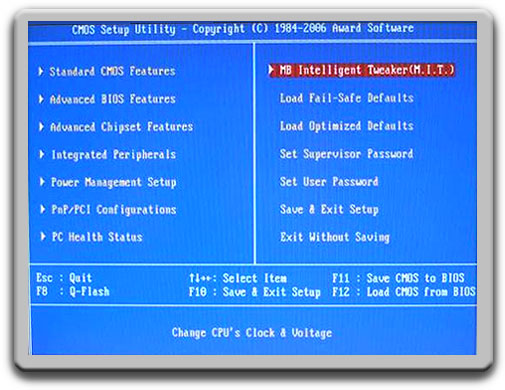
For all you overclockers out there, 2006 was quite an exciting year, especially on the Intel side. Launching their brand new Core™ Microarchitecture, Intel core-based products have been setting new standards for exceptional overall performance. Starting with the Intel® Core™ 2 Duo processor and shortly followed by the Intel® Core™ 2 Extreme Quad Core processors, overclockers and general power users alike have been squeezing some impressive performance numbers from both.
|
|||||||||||||||||||||||||||
|
|||||||||||||||||||||||||||
 |
|||||||||||||||||||||||||||
 |
|||||||||||||||||||||||||||
 |
|||||||||||||||||||||||||||
 |
|||||||||||||||||||||||||||
 |
|||||||||||||||||||||||||||
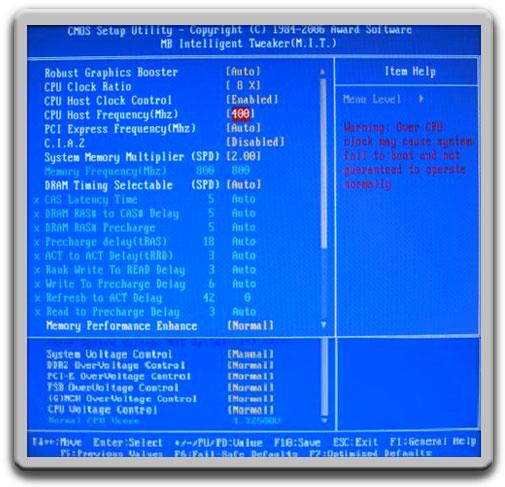
This is what your final overclocking settings should look like. |
|||||||||||||||||||||||||||
 |
|||||||||||||||||||||||||||
 |
|||||||||||||||||||||||||||
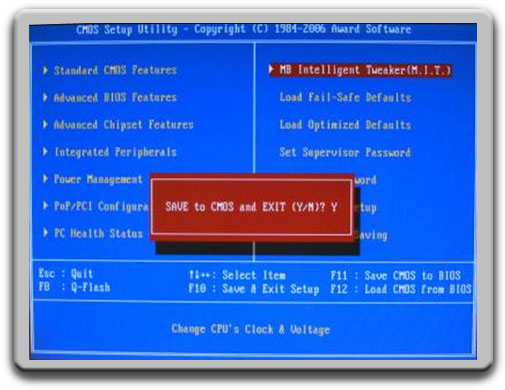
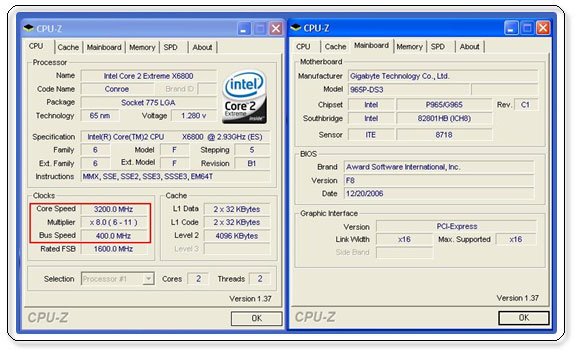
Congrats! You have just overclocked your FSB to 400MHz. |
|||||||||||||||||||||||||||
 |
|||||||||||||||||||||||||||
So now that we have done a successful overclock, let's look at the performance numbers. Obviously, people overclock in order to get a performance increase. Being able to overclock your CPU allows you to, in a sense, get more performance out of your CPU than you paid for. People on a budget can purchase a cheaper, lower frequency CPU and overclock the performance to that of one higher priced. Of course there is no such thing as a free lunch. The higher you overclock your CPU frequency, the less stable your system can become, and in fact, performance for certain tasks can actually decrease. But that is part of the fun of overclocking; seeing how far you can go while still getting the best performance to match your needs. |
|||||||||||||||||||||||||||
|
|||||||||||||||||||||||||||
 |
|||||||||||||||||||||||||||
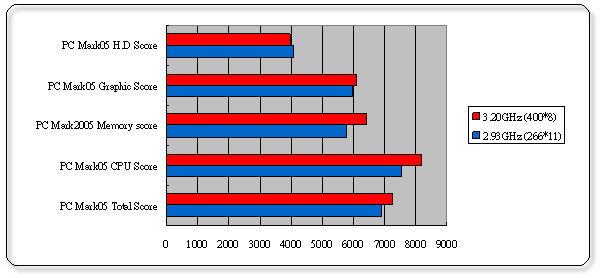
PC Mark05 is a common benchmarking tool that tests and evaluates the performance of your hardware and is broken down into 5 main categories: the hard disk, graphics, memory, CPU and the total score. Looking at the above graphs, you can see an obvious performance increase in the CPU, memory and graphic performance, with an increase in the overall score as well. For the hard drive, notice the score decreased slightly with the overclock. Remember, there are always tradeoffs when overclocking. 3DMark06 is a benchmarking tool that evaluates 3D gaming performance. Obviously, this heavily tests your graphics card performance, but also includes some CPU testing as well. For3DMark06, our overclock showed a performance increase. Super PI is used to test the performance and stability of your system. Super PI evaluates the floating point unit of your CPU by testing how long it takes for your computer to calculate pi. The lower the score, the better. Again, our overclock showed some improvement. |
|||||||||||||||||||||||||||
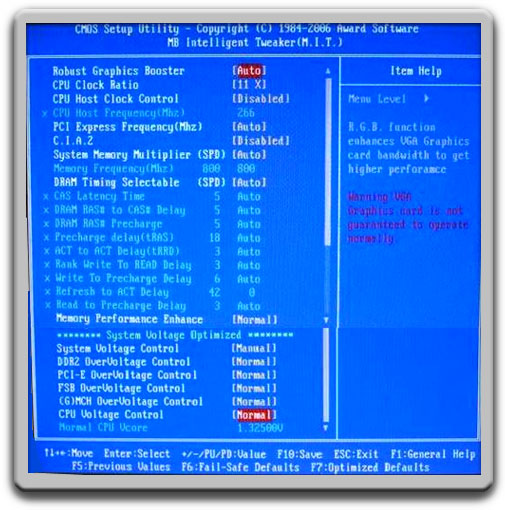
Of course there is a limit to how far you are able to overclock your CPU. There comes a point where your CPU is just not getting enough voltage. Overvoltage is another way to boost the performance of your system. By supplying your components with more power, you are able to get even greater performance for your overclocks. Again, the GIGABYTE GA-965P-DS3 has some easy-to-use tools to boost the voltage of your various components. If you noticed earlier in the MB Intelligent Tweaker (M.I.T.) BIOS screen captures, there is a section dedicated to overvoltage. The GIGABYTE MB Intelligent Tweaker (M.I.T.) allows you to control the following voltages: |
|||||||||||||||||||||||||||
|
|||||||||||||||||||||||||||
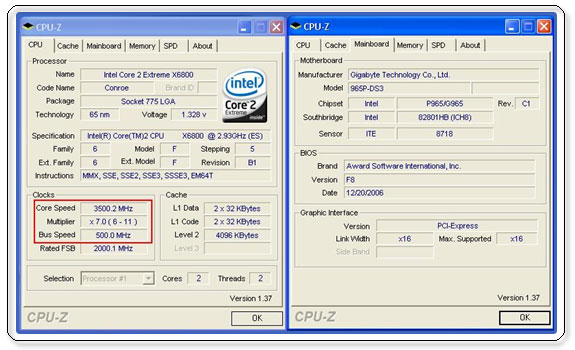
| To give an example, I was able to overclock my DS3 to FSB500 by changing the voltage to my CPU. If you notice below, I increased the voltage from 1.280 v to 1.328 v. | |||||||||||||||||||||||||||
 |
|||||||||||||||||||||||||||
| A word of caution. Be very careful when overvolting your system, as you can overload the components. Make sure to check with the various manufacturers the recommended voltages, and try not to go beyond them. | |||||||||||||||||||||||||||
All intellectual property rights, including without limitation to copyright and trademark of this work and its derivative works are the property of, or are licensed to, GIGABYTE TECHNOLOGY CO., LTD. Any unauthorized use is strictly prohibited. |
|||||||||||||||||||||||||||