| |
 |
|
|
Building the Ultimate Vista Premium System |
|
As January quickly approaches, and the consumer editions of Microsoft Windows Vista begin hitting the store shelves, I thought it would be a good idea to beat the rush and sit down and build my very own ultimate Vista System. As I know many of you out there are anxiously awaiting building your own Vista Premium systems, I hope to be able to share with you some helpful hints and tips that I learn along the way. In addition, the next few weeks as I make the jump from XP to Vista, I hope to be able to bring you some information on some of the new cool features that Vista Premium has to offer.
So without any further ado, let the hopefully non-blue screen fun begin! |
| |
 Hardware Hardware Hardware Hardware Hardware Hardware |
So, the first thing someone interested in building a Vista Premium system needs to do is decide on what hardware they are going to use. As this is a brand new operating system with its own hardware requirements, I thought it would best to take a closer look at Vista's requirements before I shelled out any cash. Before you do the same, I suggest you check out the hardware requirements on the Microsoft Vista website:
http://www.microsoft.com/technet/windowsvista/evaluate/hardware/vistarpc.mspx
|
Windows® Vista™ Premium Hardware Requirements: Minimum |
| |
Windows Vista Premium Ready |
| Processor |
1 GHz 32-bit (x86) or 64-bit (x64) processor |
| System Memory |
1 GB |
| GPU |
Intel, ATI, NVIDIA, S3,
VIA
Window Aero Capable
- Direct 9-class GPU that supports:
- A WDDM Driver
- Pixel Shader 2.0 in hardware
- 32 bits per pixel
- Adequate graphics memory
|
| Graphics Memory |
128 MB |
| HDD |
40 GB |
| HDD Free Space |
15 GB |
| Optical Drive |
DVD-ROM Drive |
|
Adequate Graphics Memory |
- 64 MB of graphics memory to support a single monitor at 1,310,720 or less
- 128 MB of graphics memory to support a single monitor at resolutions 2,304,000 pixels or less
- 256 MB of graphics memory to support a single monitor at resolutions higher than 2,304,000 pixels
- Graphics memory bandwidth, as assessed by Windows Vista Upgrade Advisor, of at least 1,600 MB per second
|
|
| |
|
The hardware specifications are pretty straight forward. It is important to note that the hardware requirements listed by Microsoft are the minimum requirements needed to run Vista Premium, not the optimum. While a system with the basic level of hardware will be able to run Window's Vista, depending on what you are going to be using your system for, you might want to go for some higher spec hardware. For example, as Vista is a very memory intensive operating system, you might want to try adding additional system memory above the 1G requirement.
Also, note Microsoft's only hard drive requirement for Vista Premium is a 40GB hard drive or larger with at least 15GB of free space. This means you can use either a SATA hard drive or an IDE drive. If you have an old IDE drive lying around and would like to save some money, go ahead and use it. If you are purchasing a new hard drive however, SATA drives offer some distinct advantages and will allow you to take full advantage of some of the advanced Windows Vista Premium features. As of July of next year, all mobile systems wanting the Windows Vista Premium logo will need to have a Hybrid Hard Drive (HHD) and all SATA devices must meet the requirements of SATA Revision 2.5 (this means a minimum speed of 3Gbit/sec and advanced features such as native command queuing (NCQ), among others must be supported). |
| |
|
| |
| Hardware for my Vista Premium System |
| |
Processor
For the CPU, I chose the new Intel Core™ 2 Duo 6700 running at 2.66GHz. As I was looking for a powerful, top-of-the-line processor for my Vista system, the Core™ 2 Duo seemed to more than fit the bill. As the reviews have been outstanding for the Core™ 2 Duo in terms of extreme overclockability, I knew I needed to give it a try.
Motherboard
For the motherboard, I decided to use the GIGABYTE GA-965G-DS4. As one of GIGABYTE's Ultra Durable motherboards, the GA-965G-DS4 features all solid capacitors, which from my previous article (read more about it here) makes a big difference in terms of stability and longer motherboard operation lifetime. The GA-965G-DS4 also features GIGABYTE Silent Pipe Technology (read more about it here) as well as advanced overclocking features including EasyTune5 and M.I.T. that will help me put the Core™ 2 Duo through its paces.
Graphics
One of the main reasons I chose the GIGABYTE GA-965G-DS4 motherboard is that it features the Intel G965 chipset with the GMA X3000 integrated graphics core. As it supports DirectX 9.0c Shader Model 3.0, it will run Vista Premium without the need for an additional graphics card.
The GIGABYTE GA-965G-DS4 is also extremely upgradeable, featuring dual PCI Express connectivity and support for ATI Crossfire technology. Lets say you are running out of cash building your Vista Premium system. Initially, you can use the Intel GMA X3000 integrated graphics processor. For those of you wanting to save some cash, this is great bargain. If in time you wanted a graphics boost, you can slot in a PCI Express graphics card or even 2 for Crossfire, and you have yourself one extreme gaming platform.
For my system, I chose to also use a GIGABYTE GV-RX13P256DE-RH graphics card. This will give us a good comparison of the performance difference using an integrated versus discrete graphics solution.
System Memory
Hearing in the forums that some people were noticing some lags using 1GB of memory for early RC1 and RC2 versions of Vista, I decided to splurge and go beyond Microsoft's recommendation to hopefully avoid these issues. For my system, I am using 2 modules of GeIL PC2-8500 DDR2 1066 memory for a total of 2GB of total system memory. While my choice definitely wasn't cheap, I believe the added performance will be worth it.
Hard Drive
For the hard drive, I am using a Seagate Barracuda 7200.7 Serial ATA drive with 80GB of storage. I had this hard drive lying around not being used for quite a while and since I splurged on the memory, I decided to save some cash here and upgrade later if I needed to. It is very important that you have at least 15GB of free space on your hard drive otherwise Vista will be unable to install.
Others
Because I plan to do some overclocking, I am using the GIGABYTE GH-PCU23-VE 3D Rocket II cooler for its fan speed control and quiet operation. I am also using the GIGABYTE GO-B5232A-27 DVD ROM and a spare Delta power supply I had lying around. |
| |
|
| |
| Windows Experience Index |
Windows Vista includes a tool that will automatically run a series of tests on the various system hardware components such as processor, memory, disk drive and graphics and rates your computer on a scale of 1 through 5 (5 being the highest). The rating is supposed to make it easier to see if your hardware is capable of running various software applications. For example, let's say your computer received a rating of 4. When you go to the store to purchase the latest video game, the game packaging features a system rating number 3 or above. This means if your system was rated higher than a 3, you should have no problem installing and playing that game. If the rating on the game was 5, your system probably will not be able to run the game. |
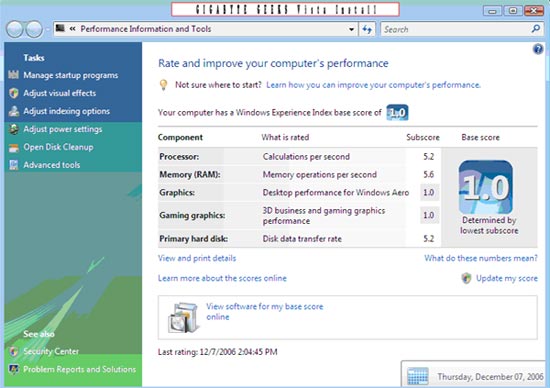 My System rating using the Intel GMA X3000
 |
 My system rating using the GIGABYTE GV-RX13P256DE-RH
|
An important thing to note is the final score given to your system is the lowest individual score your system received, not an average of all scores. As shown in the figure above, even though my CPU, memory and HD ratings were above 5, the assessment tool still rates my system as 4.2. |
| |
|
| |
| Installing Vista Premium |
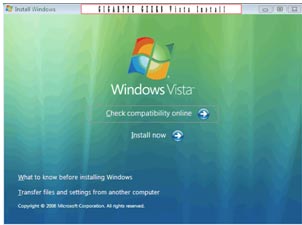
Ok…my hardware is all set up and I am ready to install Vista. As, the consumer version is not shipping until next month, I will be installing Vista Premium RC2 (Release candidate 2). This version will be very close to the release version and I don't anticipate any major differences. The RC2 will expire in February, but by then, I should be able to get my hands on the actual retail version. I will be going through the installation step-by-step, so feel free to skip if you know what you are doing.
 Step 1 Step 1
As my system is new and the hard drive is not formatted, this will be a complete installation. I need to enter the BIOS and change the settings so I can boot directly from the CDROM. Enter the Advanced BIOS Features and select the First Boot Device. Hit enter and scroll down to enter CDROM. Exit and save, and your system will now boot directly off the installation CD. If you are upgrading your system from an older version of Windows such as XP, you can skip this step. Once your computer is booted, your installation CD will automatically run.
Step 2
Follow the installation procedures. The first screen allows you to allows you to check online if your hardware is compatible. If your system is new, you probably are not connected online and if you followed the hardware requirements, you should be fine. If you are upgrading your old system, you should click check compatibility before you begin the install if you are not sure of the specs of your system. You can also transfer files and settings from a different computer before you begin the install if you wish. If not, click on Install now. |
 |
| |
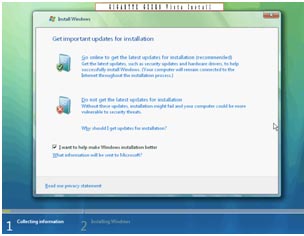
Step 3
The next screen asks if you want to go online to get the latest Vista updates. I chose not to as I can easily upgrade once Vista is installed. There is also a check box to click if you want to help make the Windows installation better. The choice is up to you. Click Next. |
 |
| |
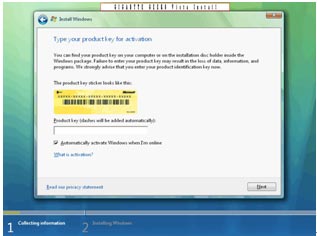
Step 4
The next screen asks for the product code. Enter and click Next. |
 |
| |
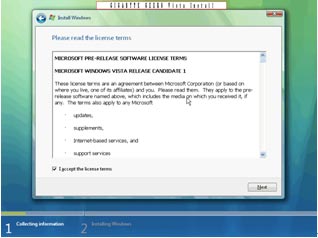
Step 5
The next screen is the license terms. Read and select I accept the license terms and click Next. |
 |
| |
Step 6
This screen asks if you are doing a Upgrade install or Custom install. If you select Custom install, please note that all your old files, settings and programs will not be saved. As I am doing a new install, I will select the Custom button. |
 |
| |
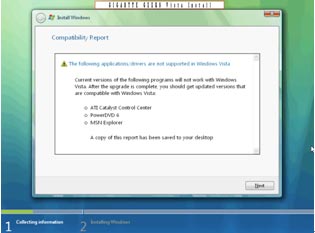
Step 7
Your next screen might show a compatibility report if certain drivers or applications are not supported in Windows Vista. If so, don't worry. Once the installation is complete, you can load the correct drivers. Click next. |
 |
| |
Step 8
Vista will automatically be installed on your system. Your computer might need to reboot several times during this process. If so, don't worry, this is normal. The installation will do everything automatically. Once Visa is installed, your computer will reboot and you will be taken to the Vista Welcome Center. |
 |
Congratulations! You are now ready to experience Windows Vista Premium. Stay tuned in the next coming weeks to learn more about some of the new features included in Windows Vista Premium. |
| |
|
|
All intellectual property rights, including without limitation to copyright and trademark of this work and its derivative works are the property of, or are licensed to, GIGA-BYTE TECHNOLOGY CO., LTD. Any unauthorized use is strictly prohibited. |
|
|
