Bitcoin is a type of digital currency in P2P form, where transactions take place between users directly. These transactions are verified by network nodes and recorded in a public distributed ledger called a blockchain. The peer-to-peer transfer represents a decentralized payment system.
Unlike most currencies, the issue of bitcoin doesn’t rely on certain monetary authorities. Instead, it’s based on a specific algorithm and created through a large amount of calculation. The main difference between bitcoin and other virtual currencies is its limited overall quantity, resulting in great scarcity. There would only ever be 21 million bitcoins in total.
Besides being created as a reward for mining, bitcoin can be exchanged for other currencies, products, and services in legal or black markets.
Now the demand for mining machines is not only for bitcoins, but also a variety of other virtual currencies such as litecoin, ethereum, peercoin and a few others.

GIGABYTE Ultra Durable
Motherboards for Ultimate Mining
Motherboards for Ultimate Mining
What is Bitcoin?
Quality Components Make Quality Motherboards

Product features may vary by model.
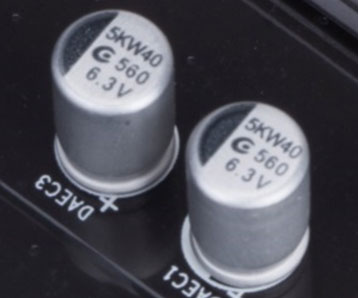
Long Lifespan Solid Capacitors
GIGABYTE motherboards integrate the absolute best quality solid state capacitors that are rated to perform at maximum efficiency for extended periods, even in extreme performance configurations. This provides peace of mind for end users who want to push their system hard, yet demand absolute reliability and stability, with ultra-low ESR no matter how high the CPU loading.
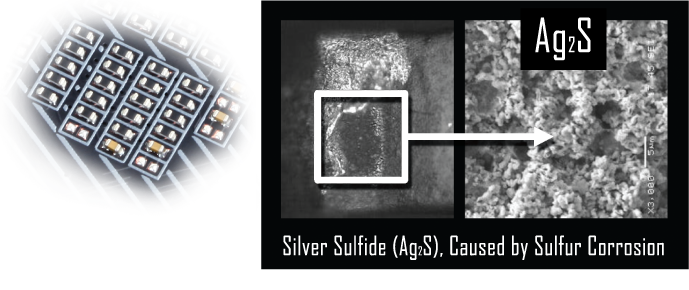
Start Sulfurization Protection
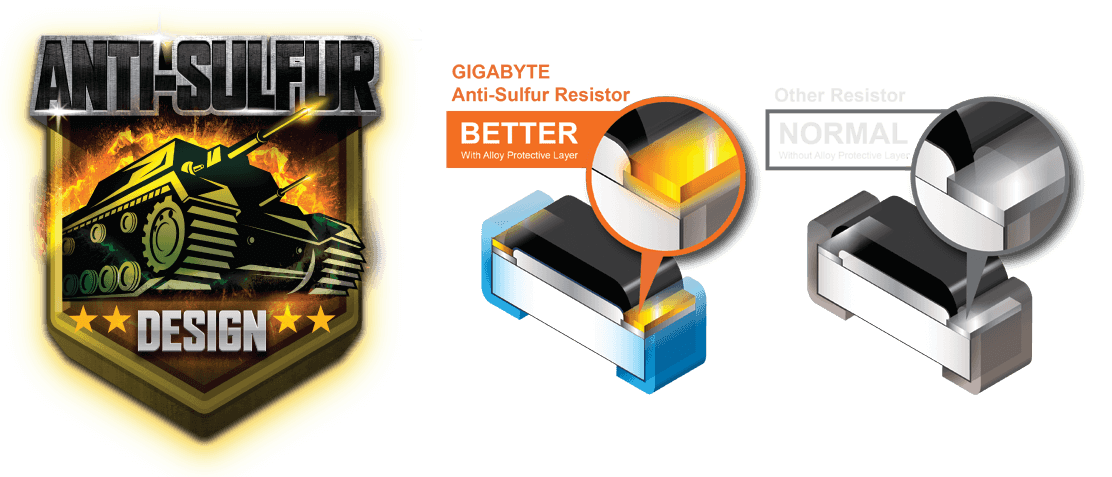
Sulfur compounds in the air can penetrate tiny onboard resistors creating chemical change and causing these resistors to open or short. If either of these occurs the motherboard will fail to function. By equipping resistors with an Anti-Sulfur Design GIGABYTE gives Ultra Durable Motherboards a whole new meaning.
How to Set Up A
Mining Machine?
Mining Machine?
- Doing hash calculation requires multiple graphics cards.
- Although hash calculation highly rely on GPU processing power,
for PCIe, the bandwidth of PCIe x1 lane is sufficient for mining calculations.
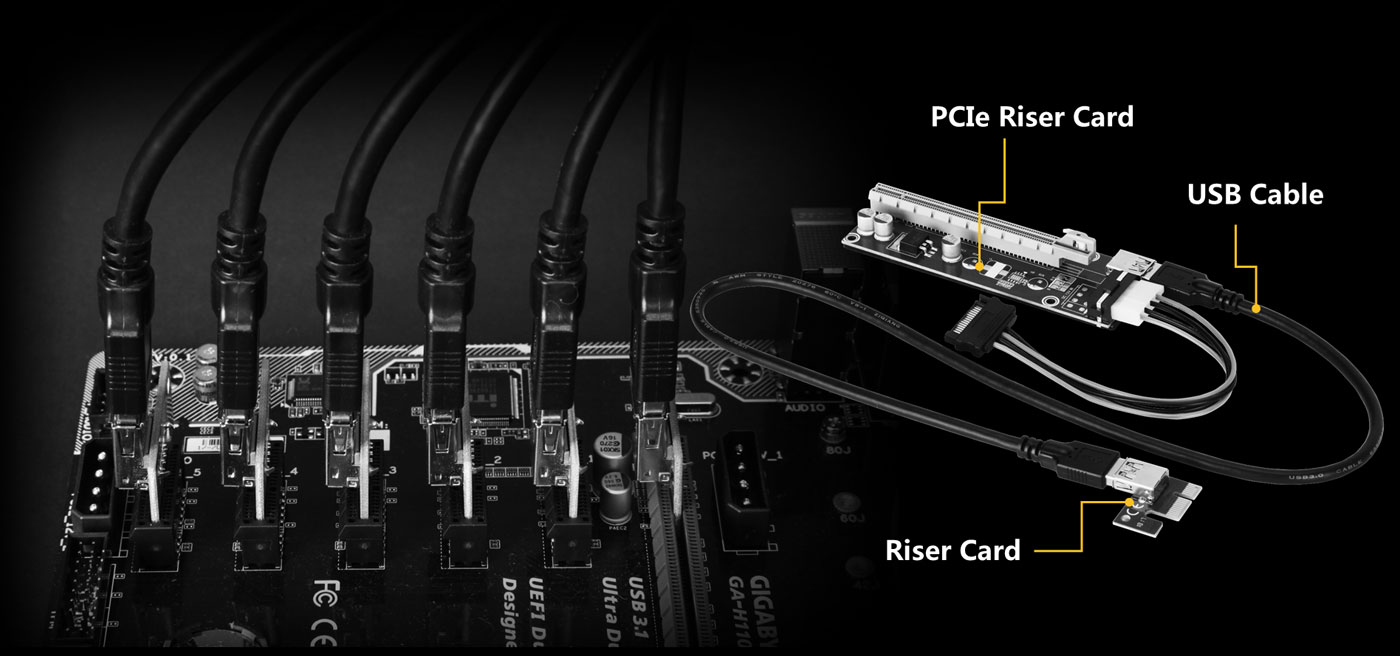
Users can extend PCIe slot via a PCIe riser card using PCIe M.2 slot.
This allows for a more flexible installation of GPUs in mining frame chassis for improved airflow.
This allows for a more flexible installation of GPUs in mining frame chassis for improved airflow.

PCIe x1 to PCIe x16 Cable
The dual PCIe power connectors provide a more stable PCIe power supply. If the Windows system fails to recognize multiple graphics cards, please change the PCIe speed (BIOS Settings) settings to “GEN 2”.
How to Set OS for Mining?
- Please note that before installing the OS, the LAN cable should be removed and the BIOS settings should have been completed.
- When installing the OS, Windows 10 version 1703 64-bit or higher is recommended.
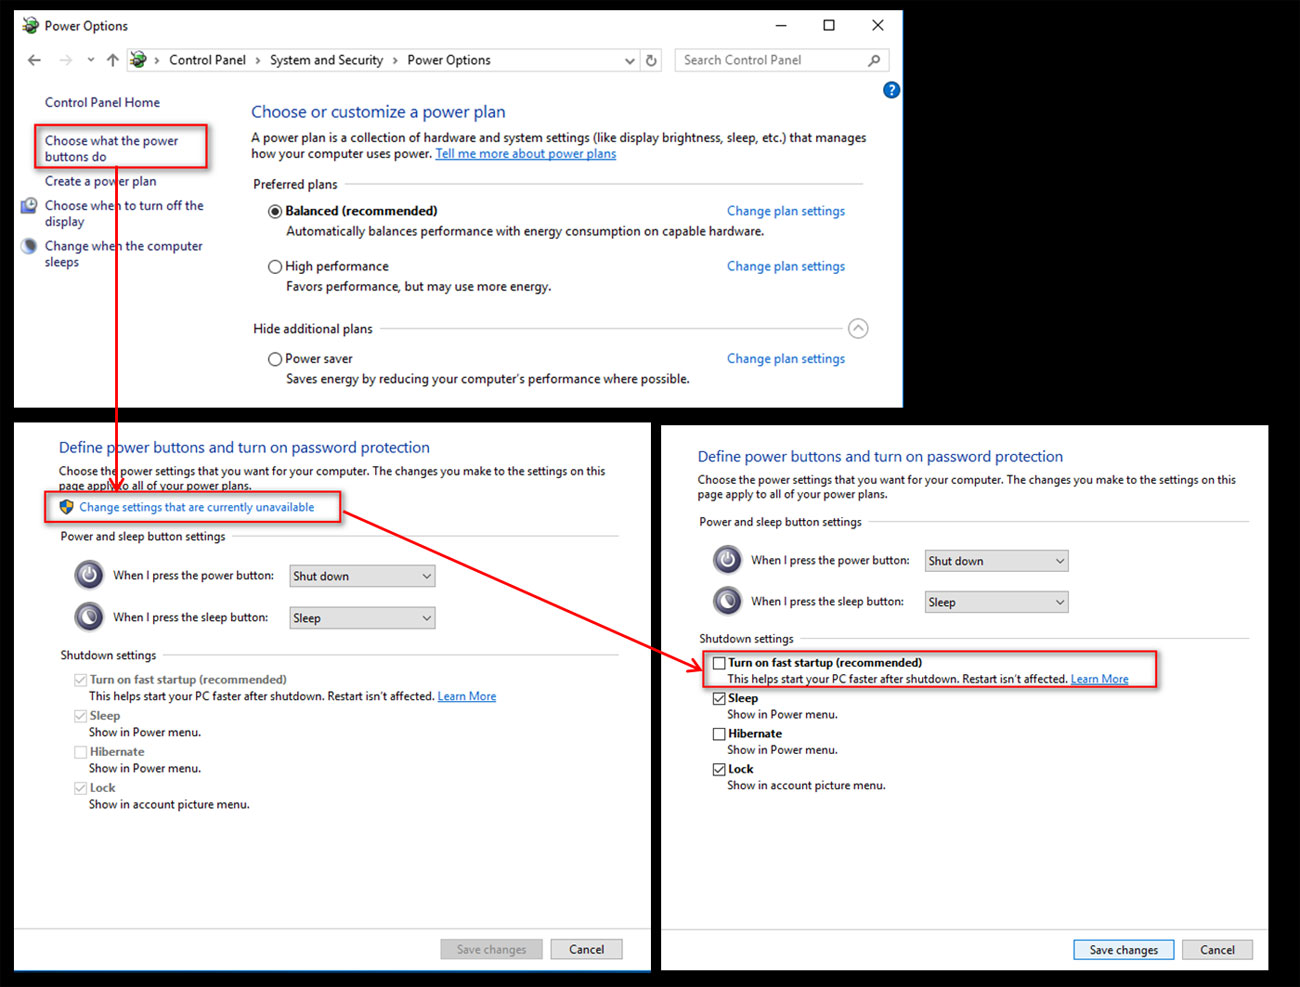
- Go to Settings / System / Power & Sleep. In the Screen section, select “Never” turn off the screen, and for the Sleep section, choose “Never” as well to prevent the system from going to sleep during mining.
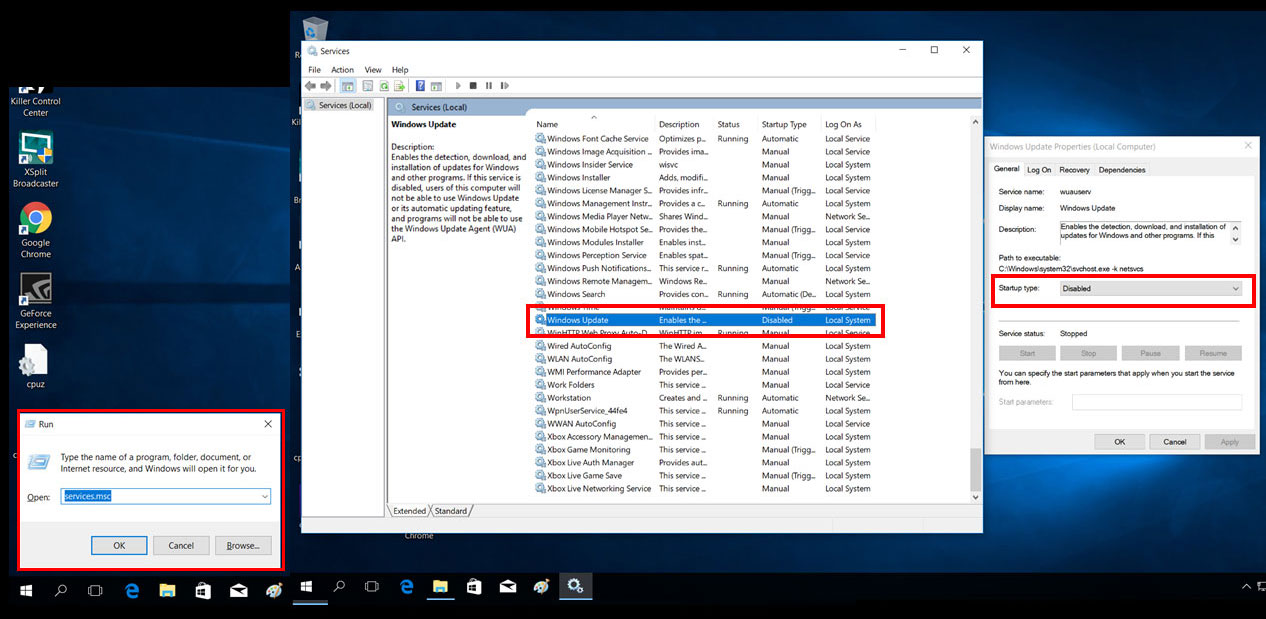
- After installing Windows 10, please turn off windows update. Only after windows update is shut down can the LAN wire be plugged back in.
- Go to Control Panel / System and Security / Power Options and select "Choose what the power buttons do". Click "Change settings that are currently unavailable" and disable the "turn on fast startup (recommended)" function.
- Install various chipset drivers for your motherboard.
- It is recommended to add only one graphics card at a time. Each time a graphics card is attached to the motherboards, install the driver to make sure it runs smoothly, then go on with the next one until all graphics cards are added.
1. Update BIOS to the latest one or the one specially for mining
Download the latest or special mining BIOS file, unzip and store it in your USB pen drive (FAT32 format). Start the system and enter BIOS. Press F8 to apply Q-Flash tool, then click “Update BIOS” and confirm.
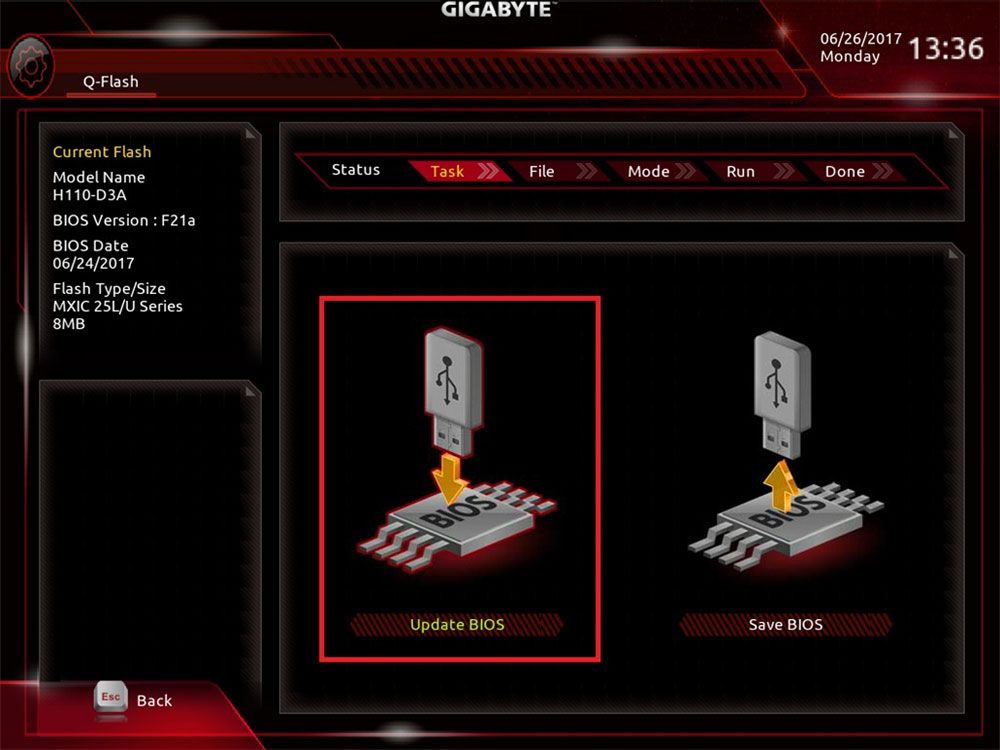
Find the BIOS stored in the USB pen drive, select and confirm.

Choose “Intact” and start to update BIOS.

After finishing the update, reboot the system and enter BIOS.
By pressing F9, you can check the current BIOS version to make sure the BIOS update was successful.

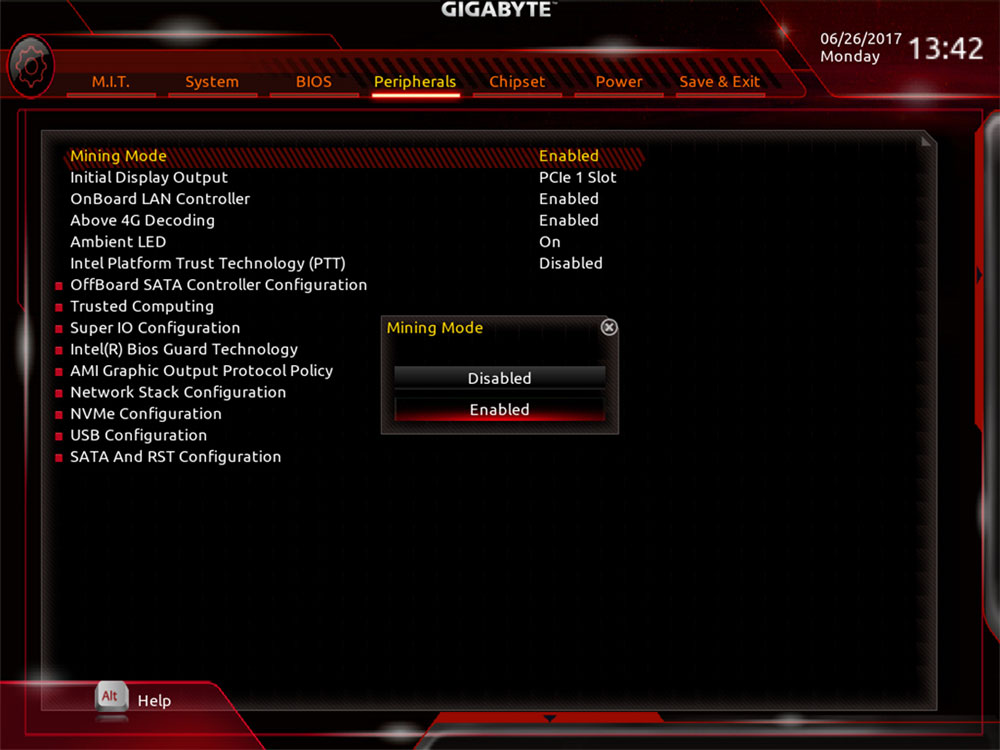
# Enable Mining Mode
please refer to last Suggested Mining MB list for Mining mode supported. After enabling mining mode, please skip step 2 to step6.
please refer to last Suggested Mining MB list for Mining mode supported. After enabling mining mode, please skip step 2 to step6.
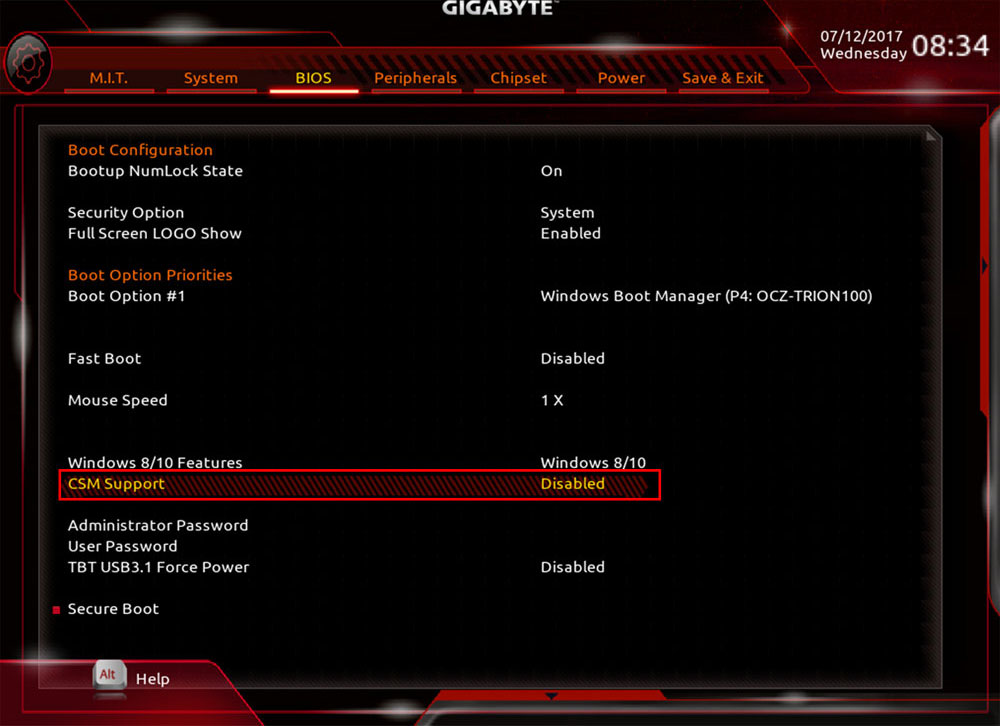
2. Disable the CSM option for UEFI mode OS.
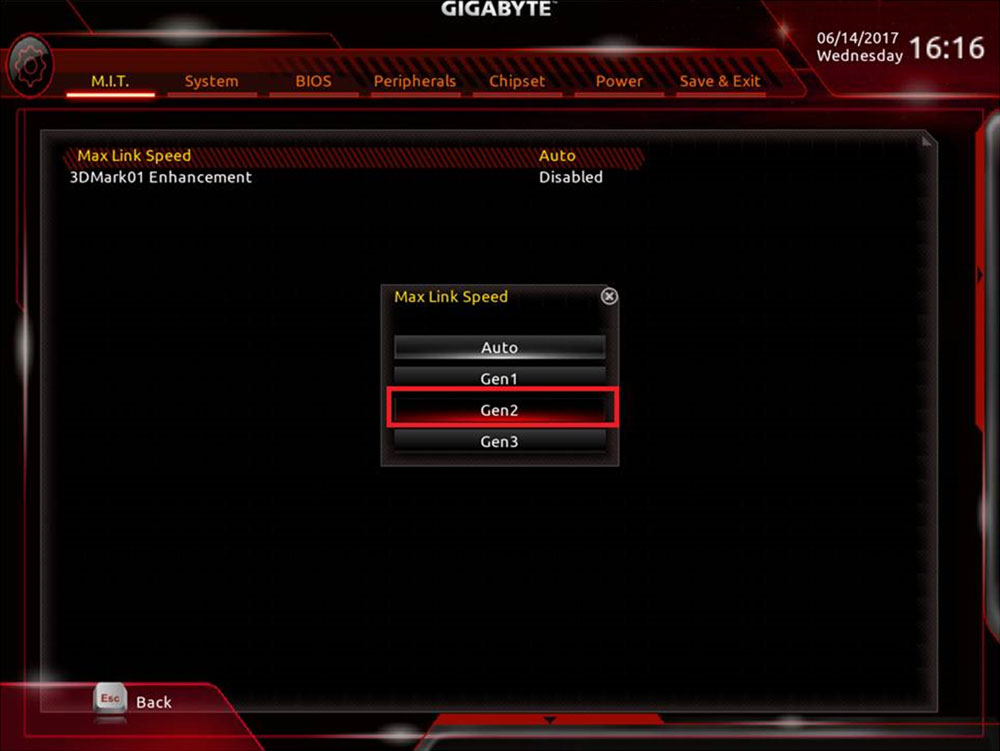
3. Change “Max Link Speed” setting from “Auto” to “Gen2”
(M.I.T / Miscellaneous Settings / Max Link Speed)
(M.I.T / Miscellaneous Settings / Max Link Speed)
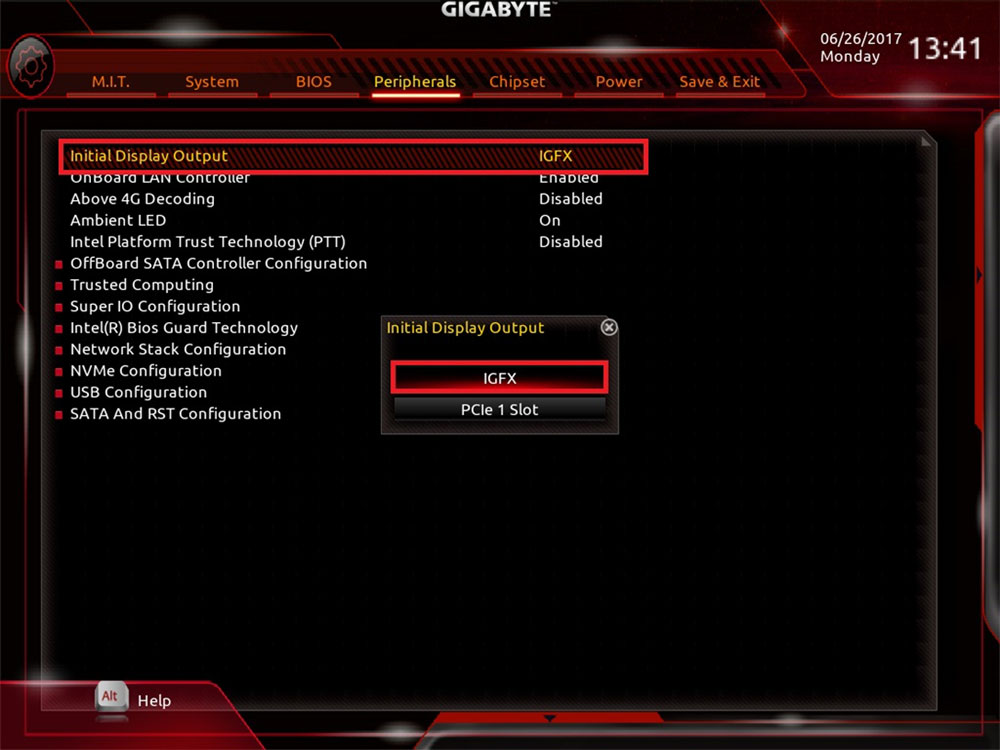
4. Change “Initial Display Output” setting from “PCIe 1 Slot" to “IGFX” (Peripherals)
5. Change “Above 4G Decoding” setting
from “Disabled" to “Enabled” if needed (Peripherals)
from “Disabled" to “Enabled” if needed (Peripherals)

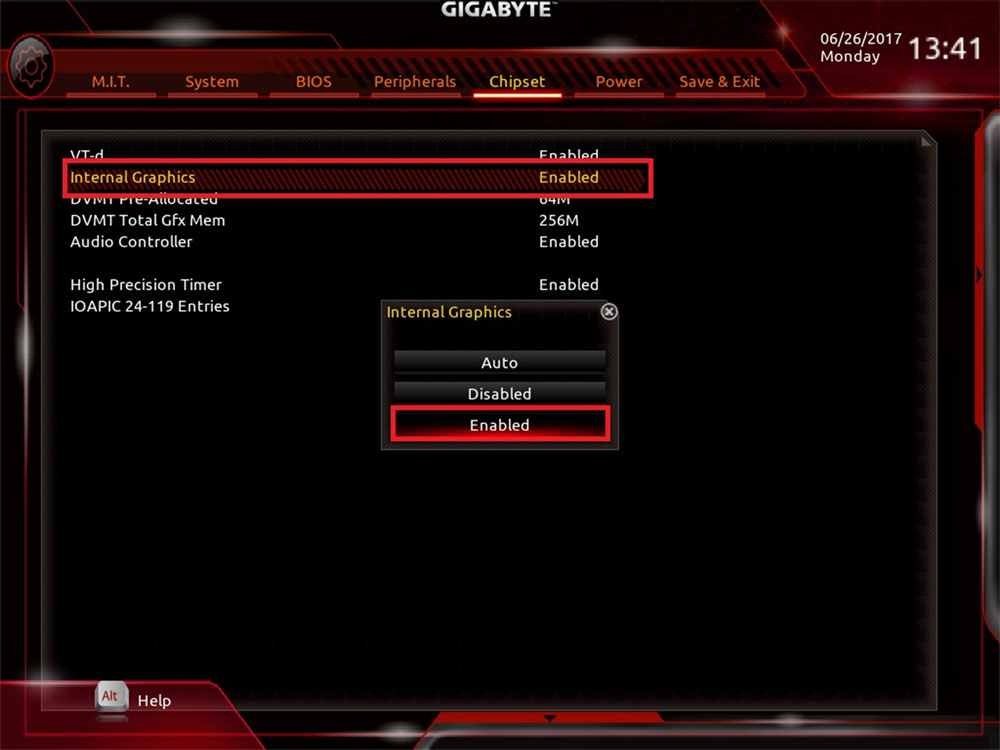
6. Change “Internal Graphics” setting from “Auto” to “Enabled”
(Chipset) , and save the settings.
(Chipset) , and save the settings.
7. Use UEFI mode to install your OS
After installing Windows 10, please turn off windows update, methods displayed as below:
After installing Windows 10, please turn off windows update, methods displayed as below:
Go to Control Panel / System and Security / Power Options and select "Choose what the power buttons do". Click "Change settings that are currently unavailable" and disable the "turn on fast startup (recommended)" function.
Suggested Mining Motherboard
No |
Model Name |
BIOS |
Specification |
Support VGA Card (Quantity) |
Note |
| 1 | B250-FinTech | F1 | 12*PCI-E | 12 | Support BIOS Mining Mode |
| 2 | Z270X-Gaming K5 | C2.F7f | 6*PCI-E + 2*M.2 | 8 | Support BIOS Mining Mode |
| 3 | Z170X-Gaming 6 | MIN.F23a | 7*PCI-E + 2*M.2 | 8 |
Support BIOS Mining Mode The PCIEX4 slot will become unavailable when an SSD is installed in the M2H_32G connector. |
| 4 | Z170X-Gaming 5 | MIN.F22b | 7*PCI-E + 2*M.2 | 8 |
Support BIOS Mining Mode The PCIEX4 slot will become unavailable when an SSD is installed in the M2H_32G connector. |
| 5 | Z170X-Gaming 3 (rev.1.1) | MIN.F22c | 6*PCI-E + 2*M.2 | 8 | Support BIOS Mining Mode |
| 6 | Z170X-UD3 | MIN.F23a | 6*PCI-E + 2*M.2 | 8 | Support BIOS Mining Mode |
| 7 | Z270-Gaming K3 | MIN.F8 | 6*PCI-E + 1*M.2 | 7 | Support BIOS Mining Mode |
| 8 | Z270P-D3 | MIN.F8a | 6*PCI-E + 1*M.2 | 7 | Support BIOS Mining Mode |
| 9 | Z170X-Gaming 7 | MIN.F22g | 6*PCI-E + 2*M.2 | 7 | Support BIOS Mining Mode The PCIEX4 slot will become unavailable when an SSD is installed in the M2H_32G connector. |
| 10 | Z170X-Ultra Gaming | MIN.F23c | 6*PCI-E + 1*M.2 | 7 | Support BIOS Mining Mode |
| 11 | Z170-Gaming K3 | MIN.F23a | 6*PCI-E + 1*M.2 | 7 | Support BIOS Mining Mode |
| 12 | Z270-HD3 | MIN.F7b | 5*PCI-E + 1*M.2 | 6 | Support BIOS Mining Mode |
| 13 | H110-D3A | F25a | 6*PCI-E | 6 | Support BIOS Mining Mode |
| 14 | Z170-HD3P | MIN.F22a | 4*PCI-E + 1*M.2 | 5 | Support BIOS Mining Mode The PCIEX1_2 slot will become unavailable when a PCIe x4 expansion card is installed. |
| 15 | 970A-DS3P FX | F1 | 5*PCI-E | 5 | |
| 16 | 970A-DS3P | FD | 5*PCI-E | 5 |
